
Step 4: Getting to the MySQL data in dBASE
 |
|
- On the previous page, we got to the point of connecting to our installed MySQL database with the BDE. If you cannot connect from the BDE, do NOT attempt to connect from dBASE. It's not going to work, as it depends on the BDE working first.
- Open dBASE Plus. Optionally, you could create a project / folder, but it's not necessary. I just want to make a quick connection to the MySQL database server.
- Select the 'Tables' tab.
- Open the dropdown list and select the database alias that we have created in the previous step.
- It will open the test database which, as we discover, has no tables in it. To try out our new database, we're going to have to create a new table.
- In the Navigator, double-click on 'Untitled' to create a table. A window appears that gives you a choice of Wizard or Designer for your new table. Choose the Wizard button:

- A window titled 'Table Wizard - Step 1 of 2' appears. We will create a table based on the sample called 'Billing Info':
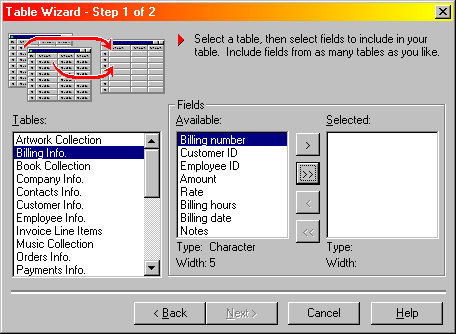
To do so, click on Billing Info in the first column under 'Tables'. The second column is then filled with a series of possible fields for the new table. I could pick and choose, but I am content to use them all. Remember, it's only a test database and this is only a tutorial. - To populate our new table with all available fields, click on the '>>' button between columns 2 and 3. This will move all of the field names from the 'Available Fields' column to the 'Selected' column:
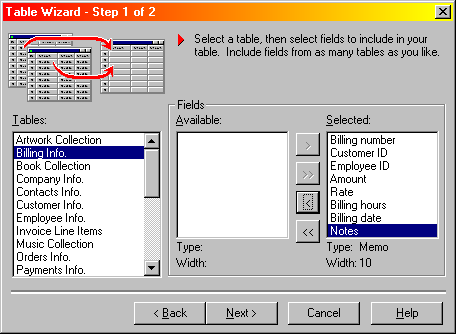
The 'Next' button becomes active when you have 'moved' at least one field name into column 3. Click on 'Next'. - The window title changes to 'Table Wizard - Step 2 of 2' and we are asked to choose a table type. The dropdown list includes only the 'mySQL' type so we don't have to choose anything:
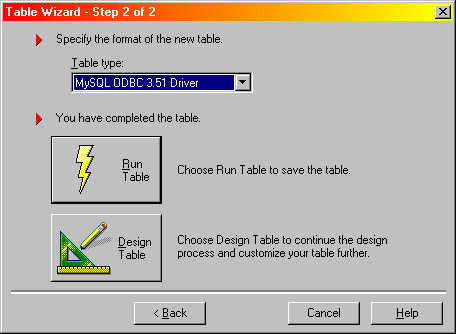
- Below the table type selector, we are told that we have completed the table. Click on 'Run Table' to save it. That's right - click on 'Run Table' to save it.
- The 'Save Table' dialog box appears where we are to enter a name for our new table. The 'Save In' and 'Save As' are greyed out, as the real "location" of the new table is our chosen database, as indicated by the green icon at the bottom of the window:
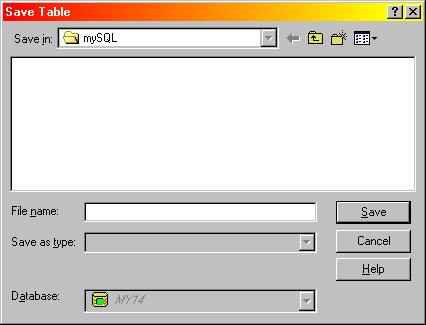
In the 'File Name' entryfield, type in a name for your new table. I called mine 'billing'. Click on the 'Save' button. - The following dialog box appears:
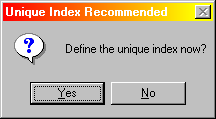
The wizard recommends that we create a unique index, so we will. Click on 'Yes'. - A window titled 'Manage Indexes' appears. Click on 'New...' to create the unique index:
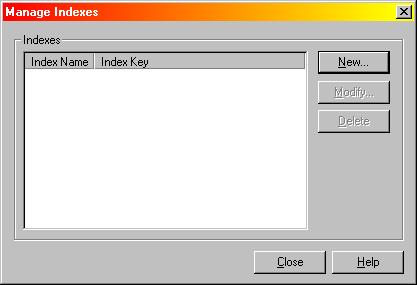
- A window titled 'Define Index' appears, where we will, um, define an index. The wizard has thoughtfully checked the Unique option for us. Once again, we are given 2 columns with some mover buttons between them:
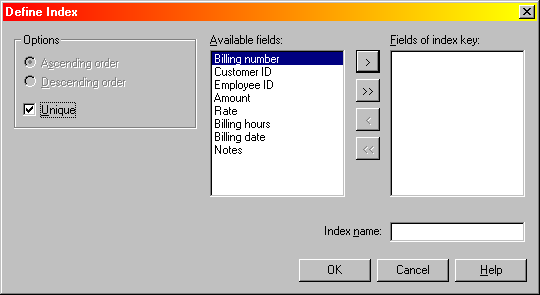
- To create a simple index, we will move the already selected field 'Billing number' from 'Available Fields' to 'Fields of index key' by clicking on the '>' button. In the 'Index Name' entryfield, type in a meaningful name for the index. I called my new index 'BillingID':
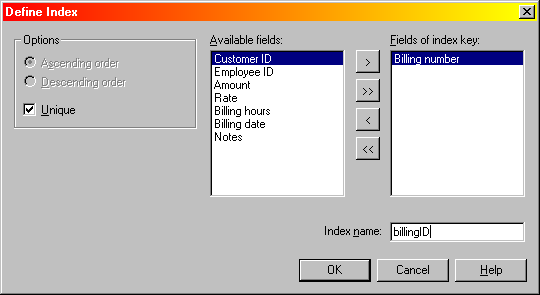
Click on the 'OK' button to complete the index definition. - We are returned to the 'Manage Indexes' window, which now shows our newly-created index:

Click on the 'Close' button. - dBASE sends our new table definition to mySQL, where the new table is created. An empty table window appears with only the field names across the top.
- I prefer to have a columnar record instead of a grid, so I choose that on the dBASE toolbar. Then I click on the 'Add Row' button to add the first row of data. This is the culmination of all of our hard work, where we finally get to enter a record! Fill in the fields with relevent meaningful data. Click on the 'Save' button on the toolbar to save your new record. Close the table window.
- Before you close dBASE, it's a good idea to restore the table folder. Select a folder on the 'Tables' dropdown selector, rather than leaving it connected to an ODBC database. Open the dropdown list, and choose a folder. The previously selected one that matches the other tabs is in italics so that makes a good choice.
- Close dBASE.
- I am now the happy owner of a mySQL database that I can access from dBASE !
- Good luck and let me know if you find any errors in this tutorial. Thank you!
Prev: Step 3: Configuring a BDE Alias for MySQL
Next: OPTIONAL Step 5: Provide feedback/comments on this tutorial
The MySQL Logo is a registered trademark of MySQL AB in the United States, the European Union and other countries.
Problems? Comments? Please contact us.
![]() © dBASEHost.com
Home
About
© dBASEHost.com
Home
About